Spooktacular Haunted Gingerbread House with Sweet Creations by Good Cook’s Haunted House Cookie Cutter Set #goodcookcom #goodcookkitchenexprt #sweetcreations

This post may contain affiliate links.
Thank you for visiting Cori's Cozy Corner! Please make sure to like us on Facebook, follow us on Twitter and subscribe to our E-mails!

Disclosure- I received the item(s) mentioned below to conduct my review.  I received no other compensation and my opinions are 100% my own.
gingerbread house
Halloween is such a fun time of year.  I love decorating my house, helping my girls pick out costumes, and seeing the joy in all the children’s faces when they go trick or treating.  It is one of my favorite holidays.  That’s why I signed up to be a part of the Sweet Creations by Good Cook Haunted House Party Kit event.  I received several awesome items to create a Halloween themed party including a Hunted House Cookie Cutter Set, Hunted Cupcake Display, Halloween Cake Pops, and a Frankenstein cookie cutter.
My original plan was to make a gingerbread haunted house, Halloween cupcakes, Frankenstein cookies, and Halloween Cake Pops to bring to my daughter’s Girl Scout troop’s Halloween party.  Unfortunately my grandmother was in the hospital and so are plans changed and we weren’t able to bake everything or go to the party.  My grandmother is finally home thankfully and seems to be doing a little better.
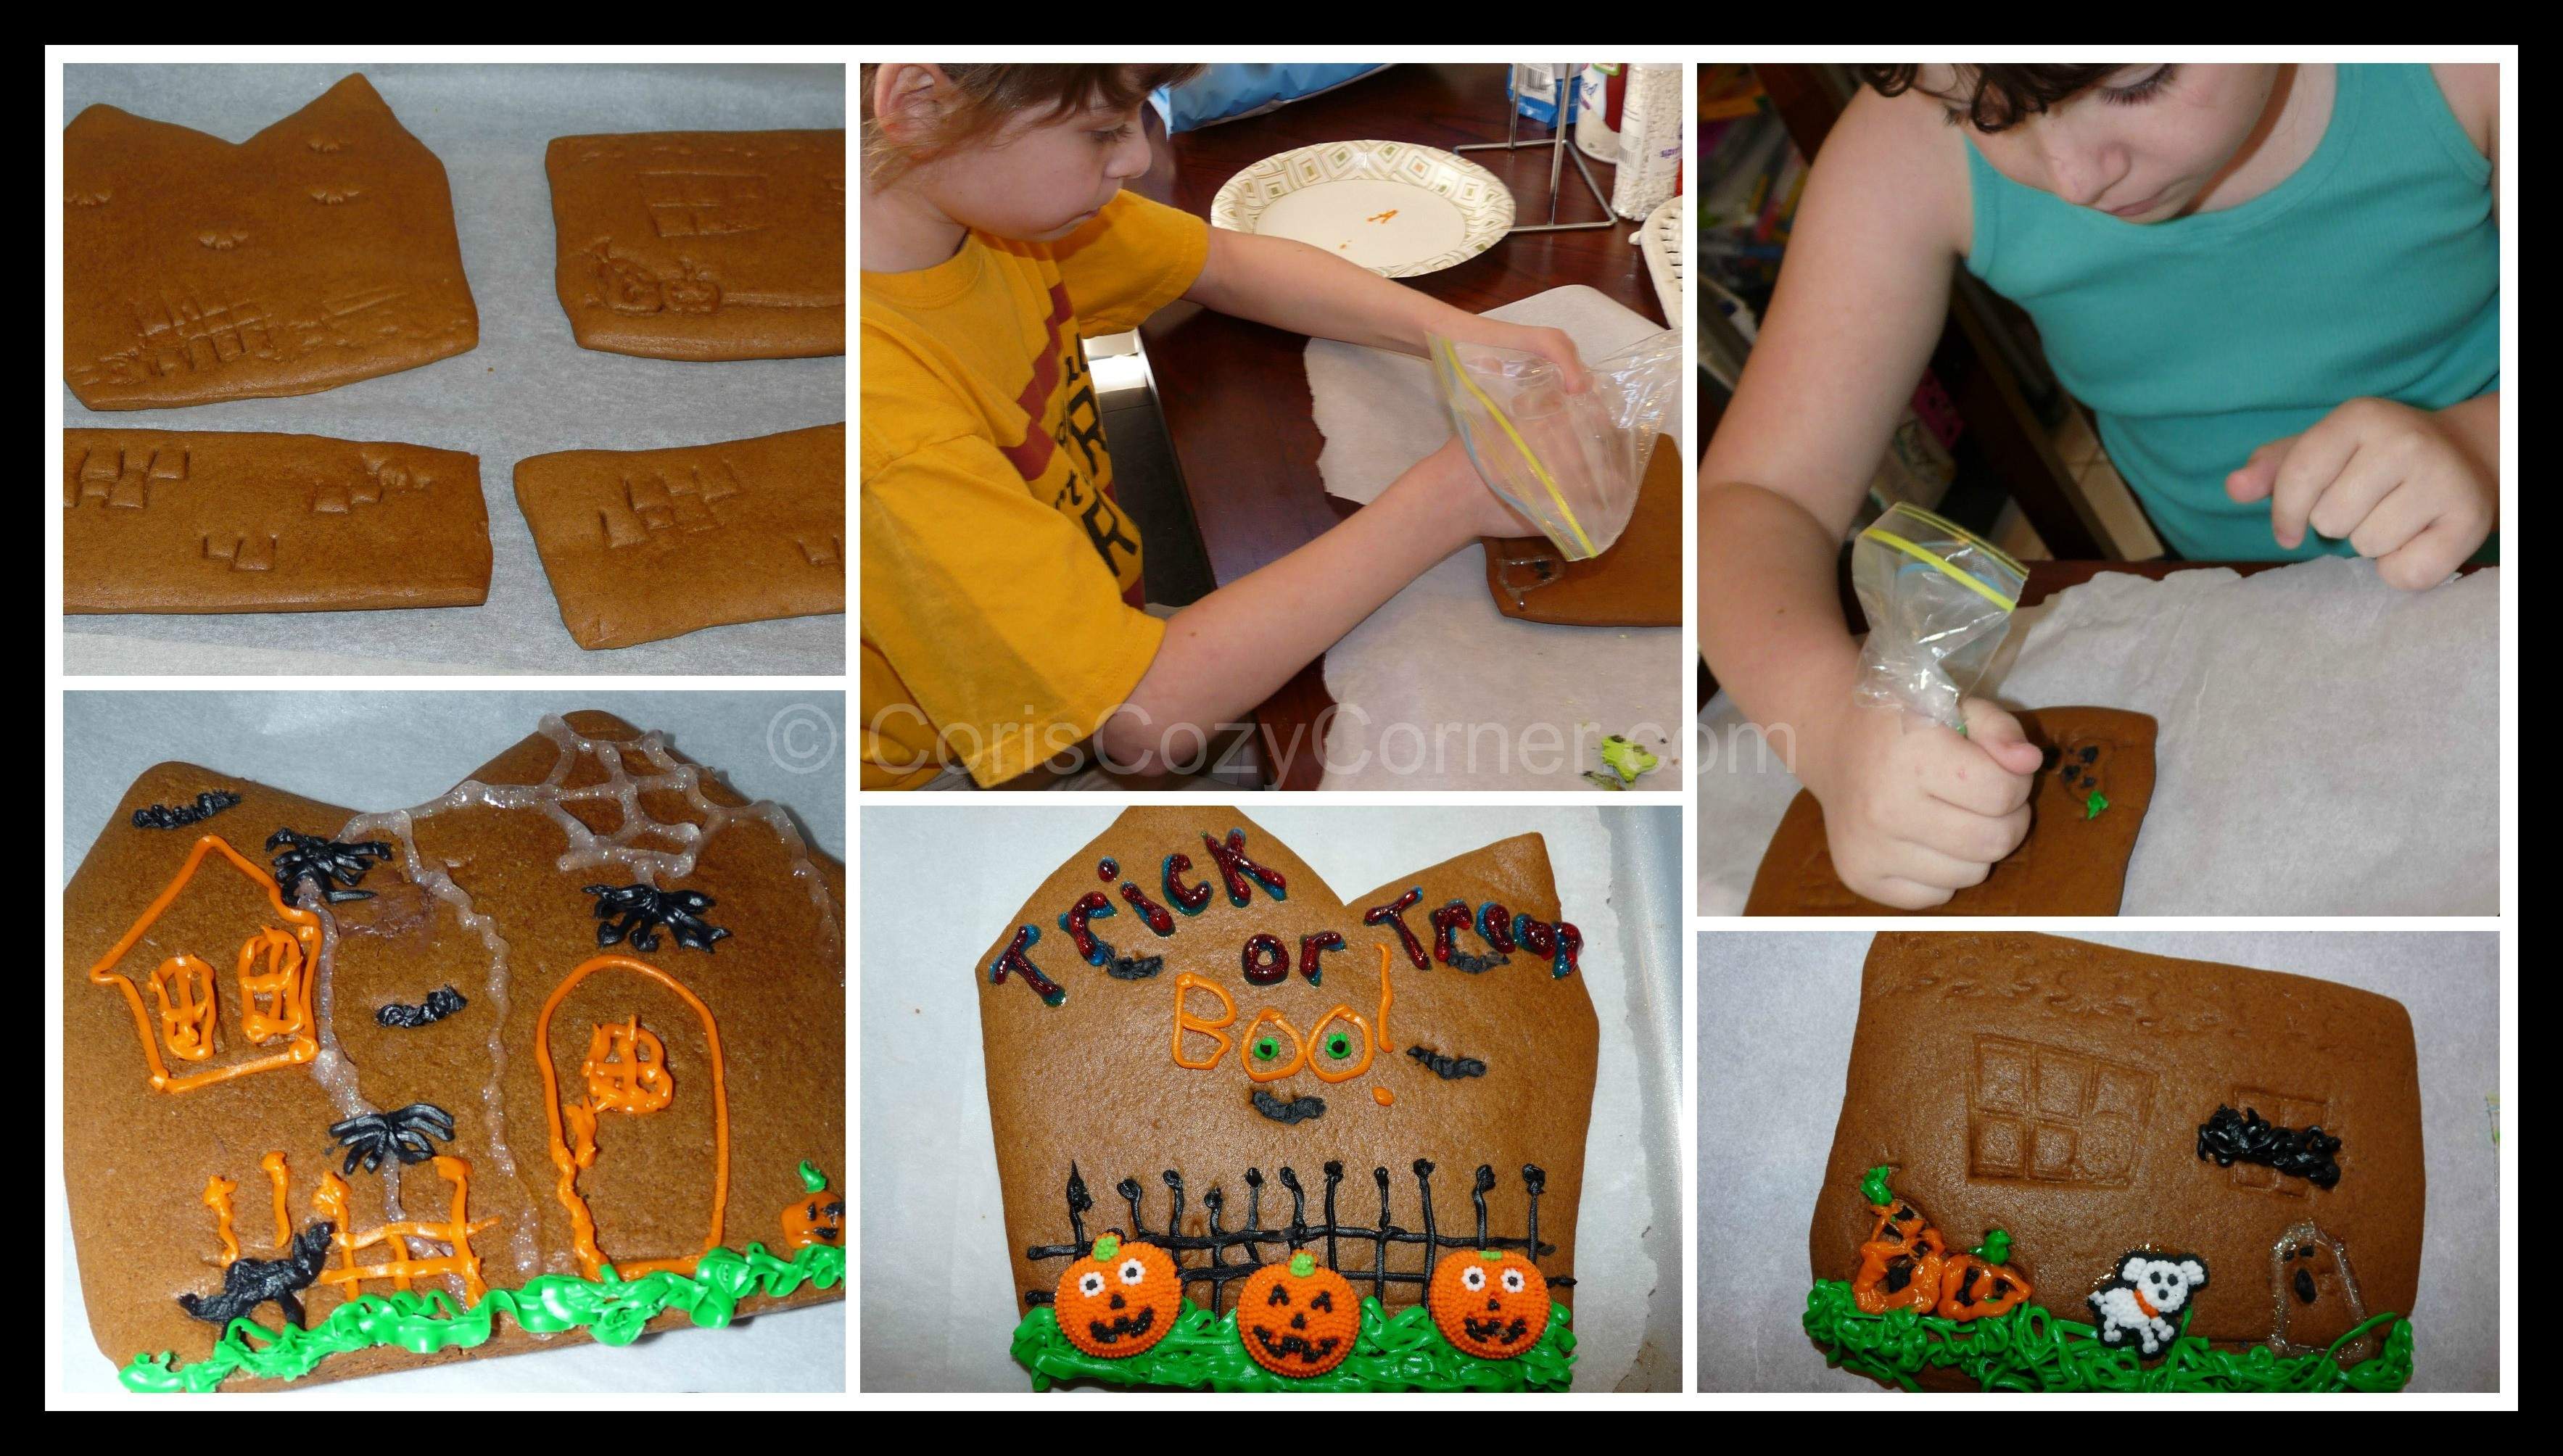
We had already made the gingerbread cookie dough before I received the call to go to the hospital so once my grandmother came home I was able to finish the Haunted Gingerbread House with my girls.  I hope to still make the cupcakes and Halloween cake pops with them later this week.
I will admit that I was a little intimidated by the thought of making my own gingerbread cookie dough as I don’t normally bake, but the instructions on the Hunted House Cookie Cutter Set seemed easy enough so I figured I’d give it a try.  Several other bloggers had mentioned that they didn’t have enough dough when they followed the recipe on the box so I doubled it and had extra dough which was great because then my girls were able to use the Frankenstein cookie cutter to make some cookies plus they used some dough to make their own free form creations.  The dough was very easy to make following the directions and the final product was yummy.
We rolled out the dough on several pieces of parchment paper using a rolling pin and a piece of parchment on top of the dough to keep it smooth.  We found that it is much easier to just move the whole bottom sheet of parchment paper onto a cookie sheet then to roll and cut out the cookies and then try to move each of them onto a new piece of parchment on a cookie sheet.  Once the dough was about 1/8 of an inch think we used the cookie cutters that came with the kit to create 4 roof pieces, 2 side walls, the front wall, and the back wall.  My girls had fun turning the cookie cutters over to stamp each wall with different designs and then use the roller to stamp on bats and spiders.
gingerbread dough
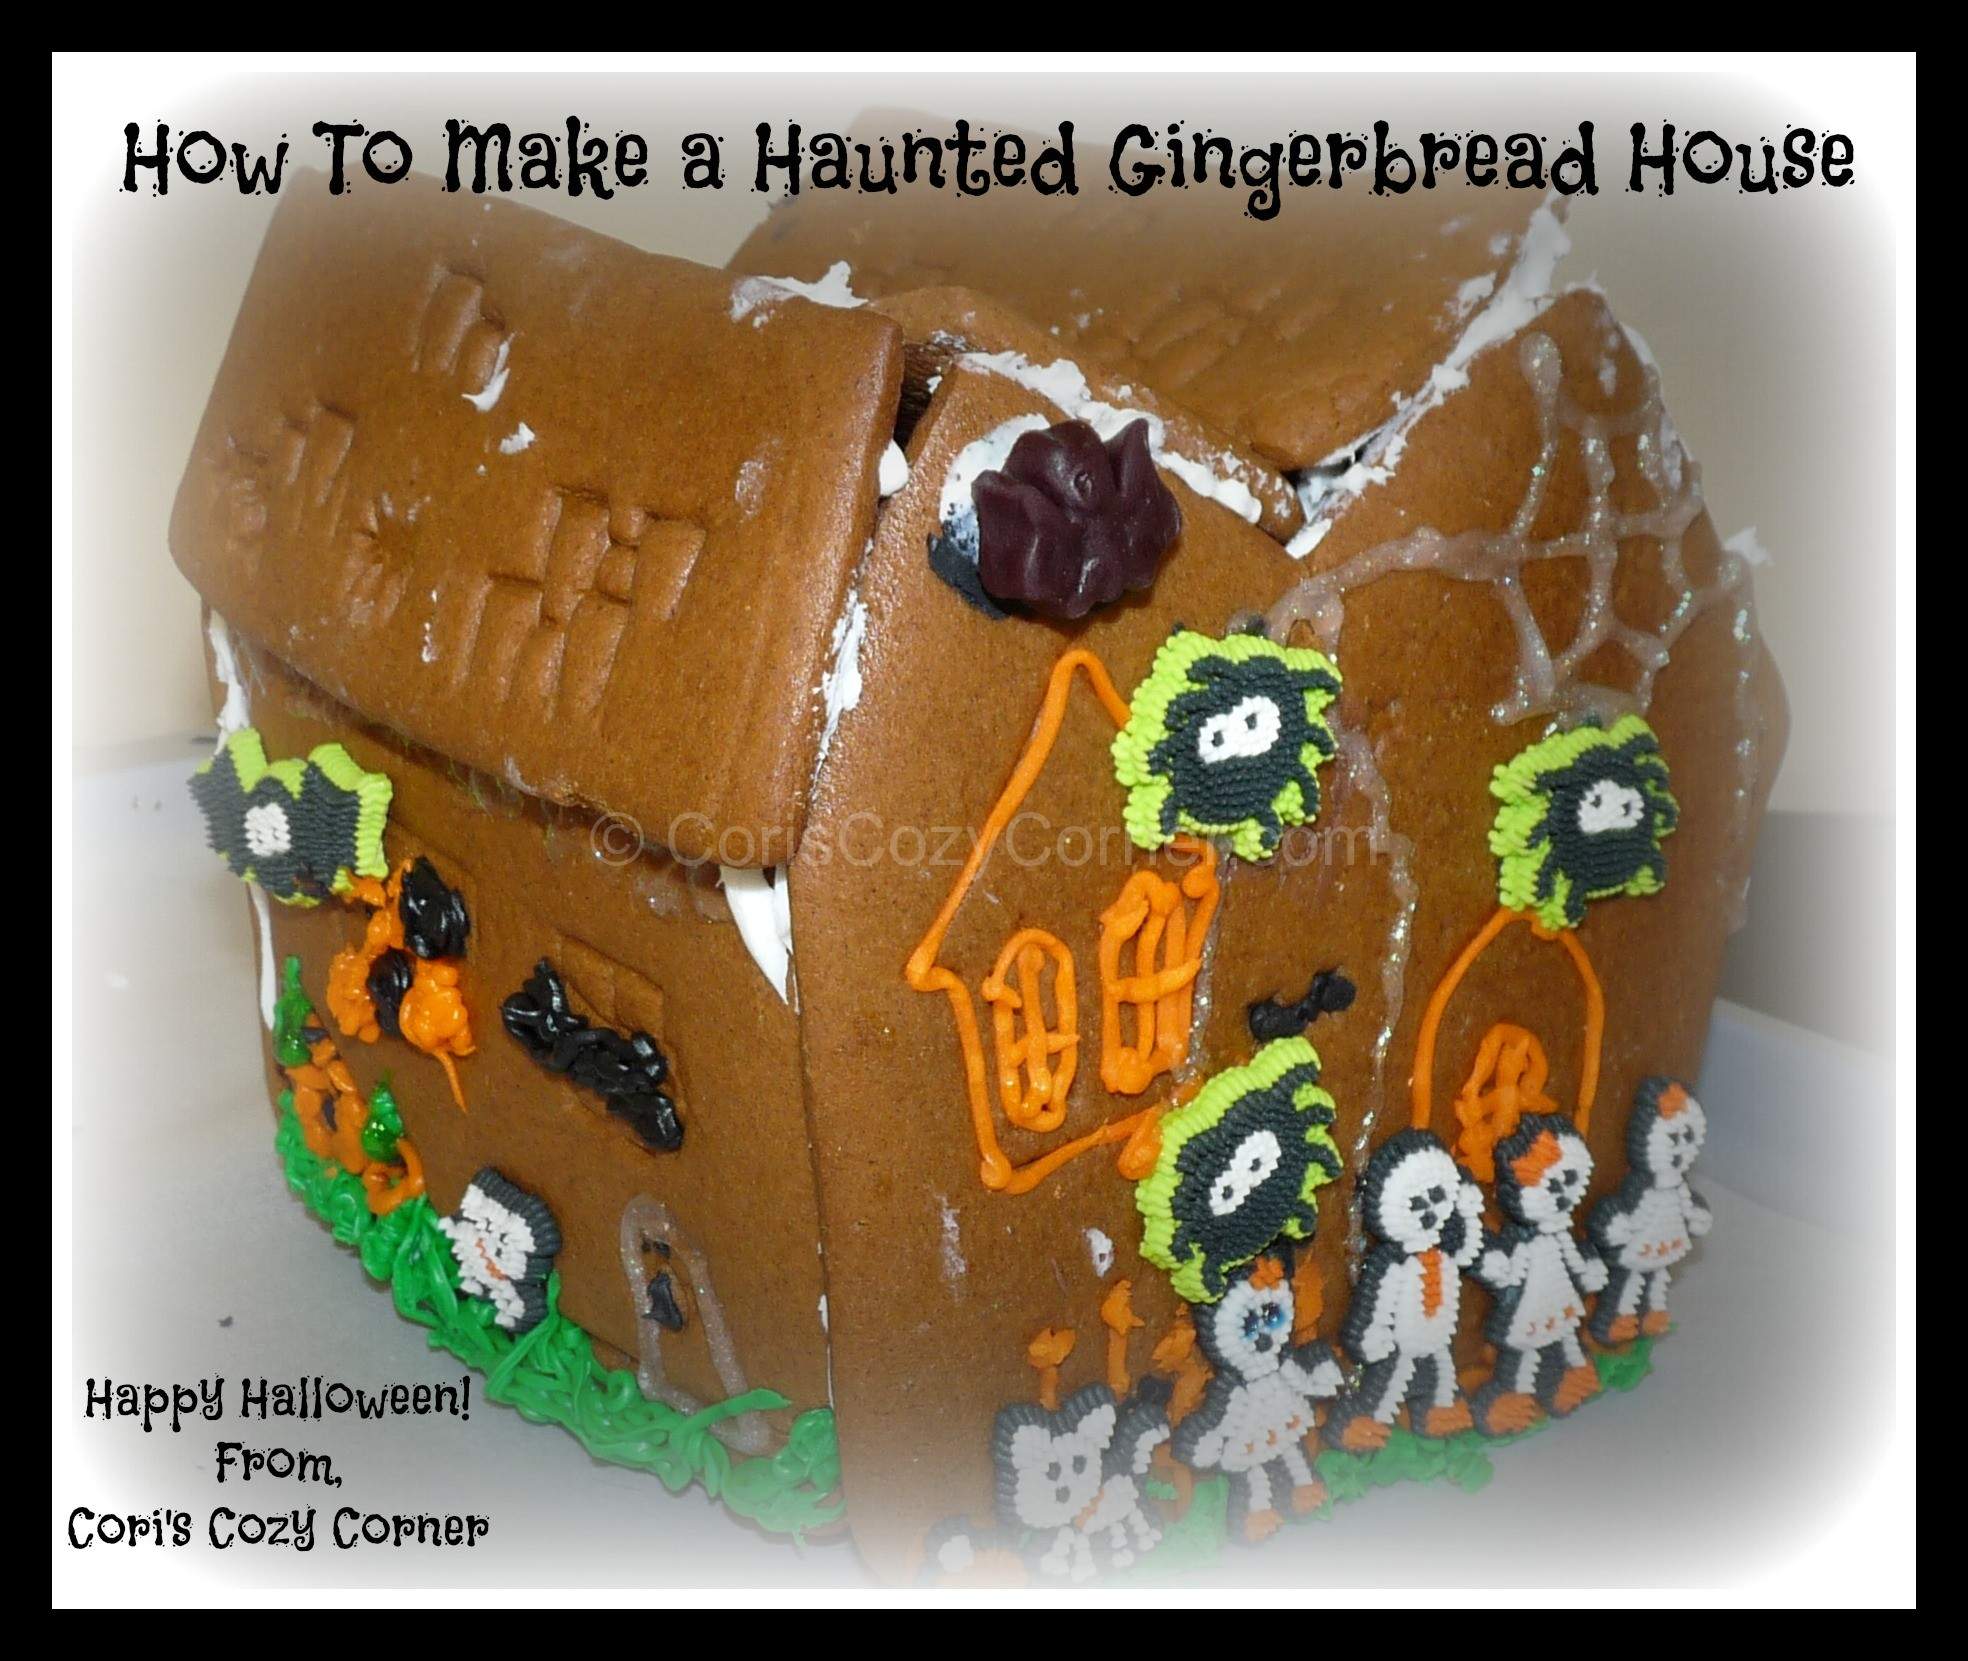
Once the gingerbread cookie house panels cooled I still felt that they were a little too soft and spongy (I probably made them a little too thick so they didn’t crisp up enough).  I melted some chocolate and painted the inside pieces of the house to give them strength when one of the pieces cracked down the middle but that was totally my fault for handling them before they were totally cooled.  If done correctly you should be able to let the pieces cool and then assemble them without the chocolate as support.
gingerbread2
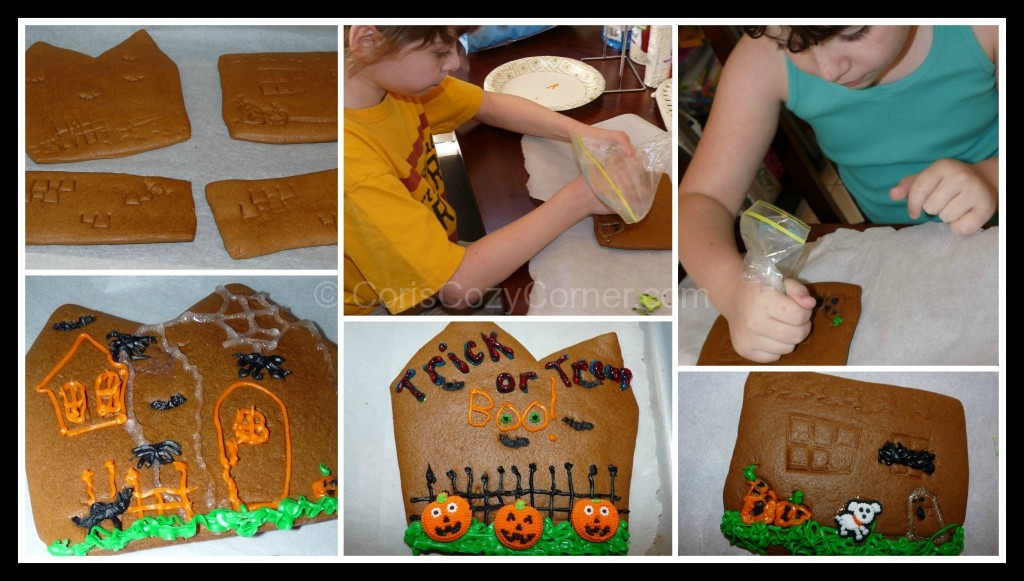
Once all of the walls were firm we decorated them with icing, candy, etc.  I put icing into the corner of plastic baggies for my girls and snipped the ends to make easy piping bags.

gingerbread3
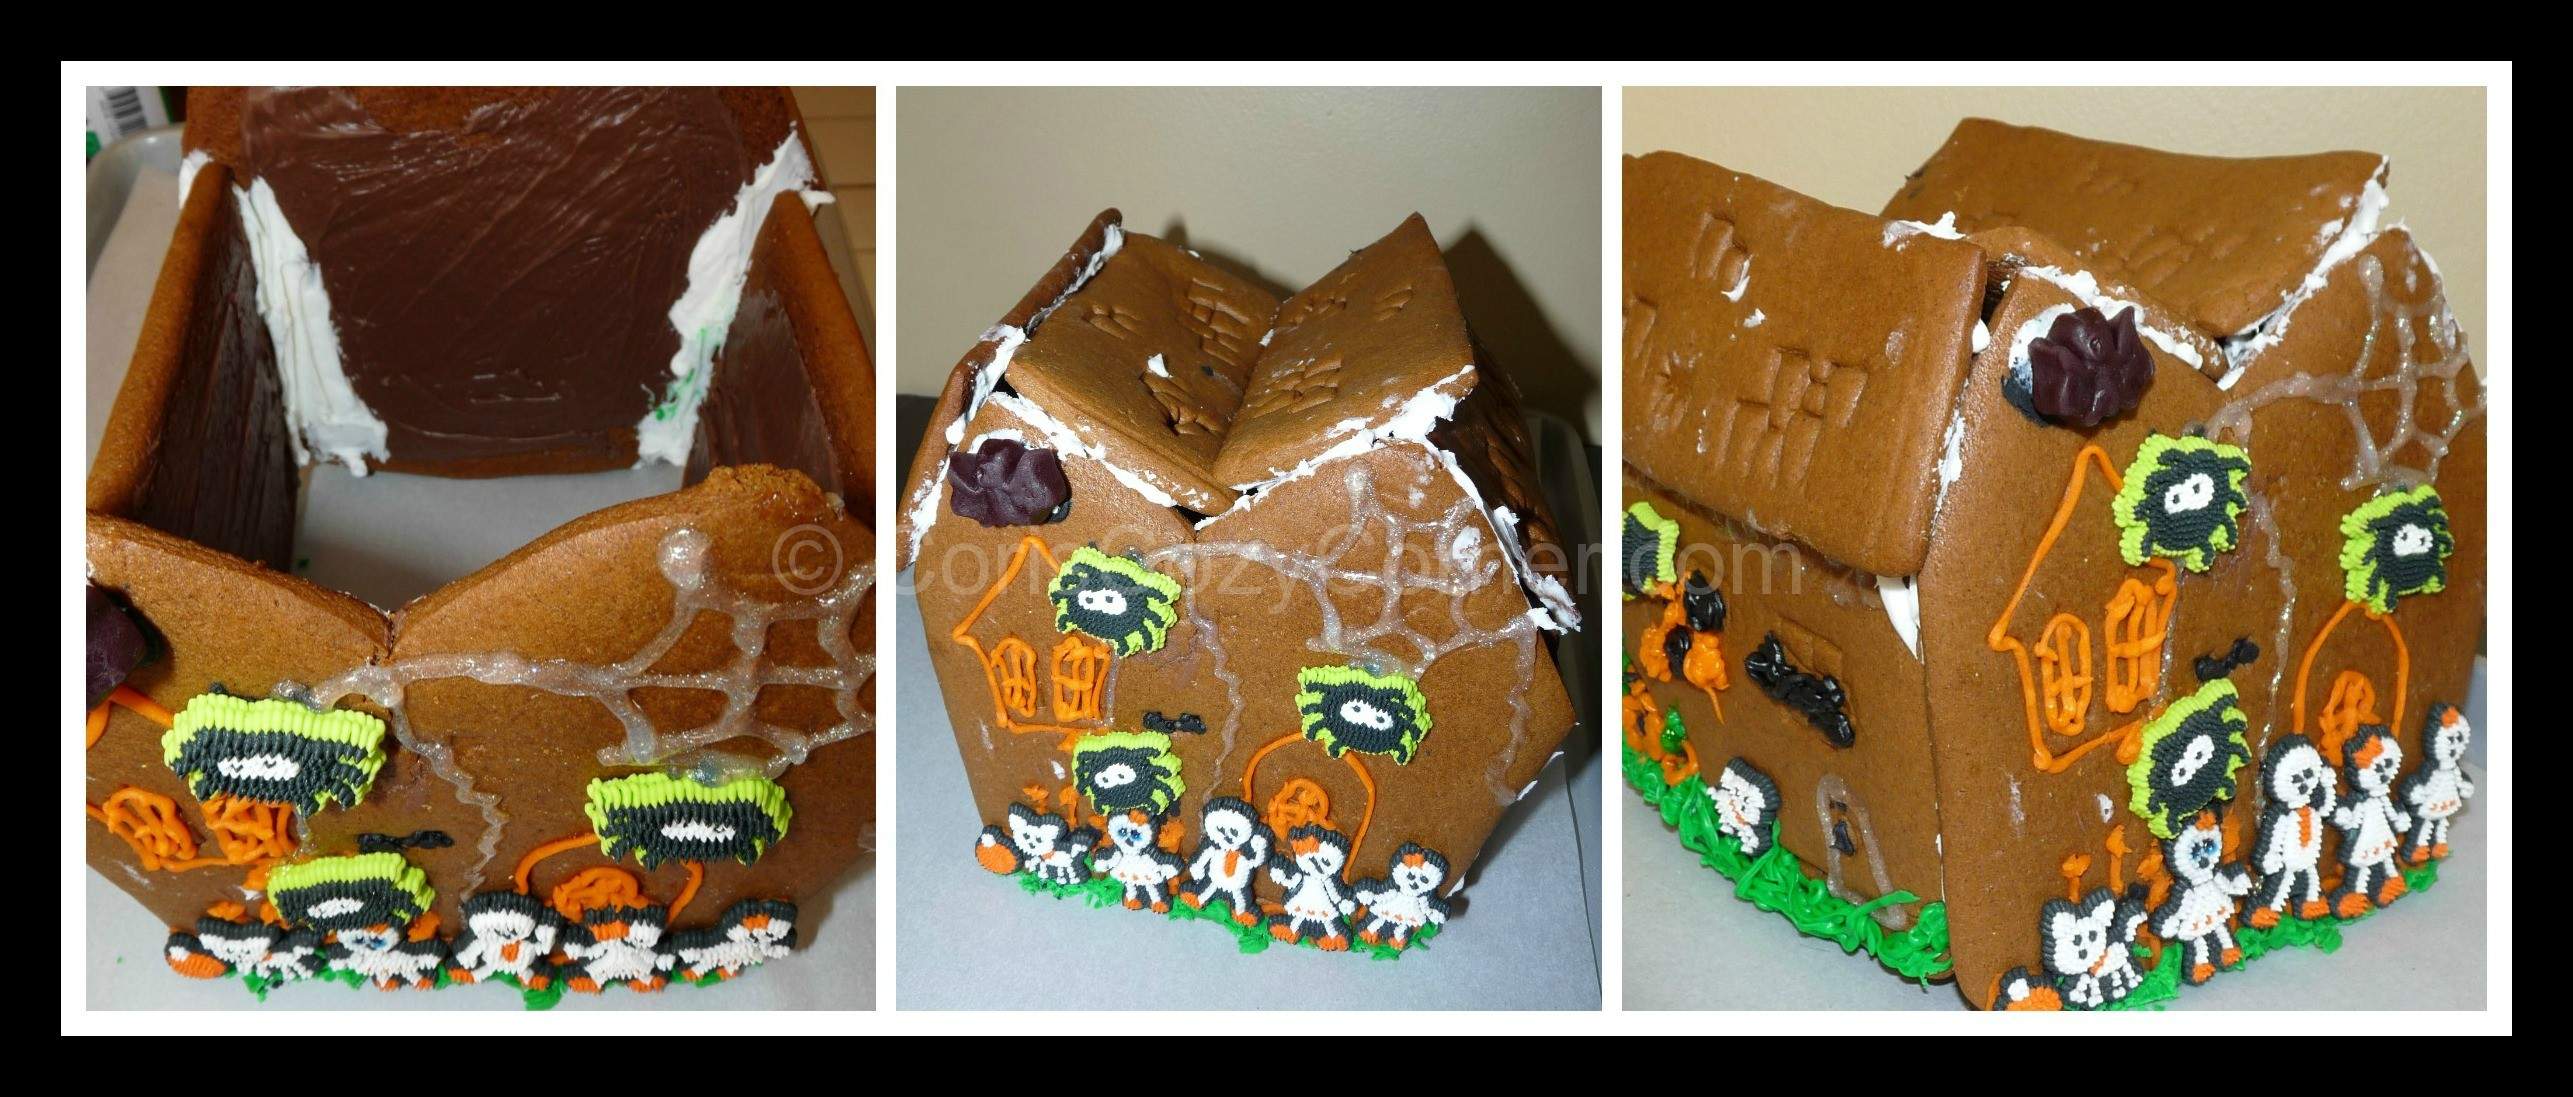
The box says to use royal icing to assemble the house.  I didn’t have royal icing so I used decorator’s icing because it hardens similar to royal icing.  While it did hold the house together, I don’t think it was as firm as royal icing would have been unfortunately.  Live and learn!  I was able to assemble the house and take some pictures but before I had the chance to smooth the icing a little to perfect it and let my girls create a candy scene around the gingerbread house, it fell apart and the front wall broke.  My girls and I had so much fun working together and it was a great learning experience for all of us.  I think the Hunted House Cookie Cutter Set is easy to use if you have a little baking experience.  It just takes some patience and a lot of royal icing to hold it all together.

frankenstein
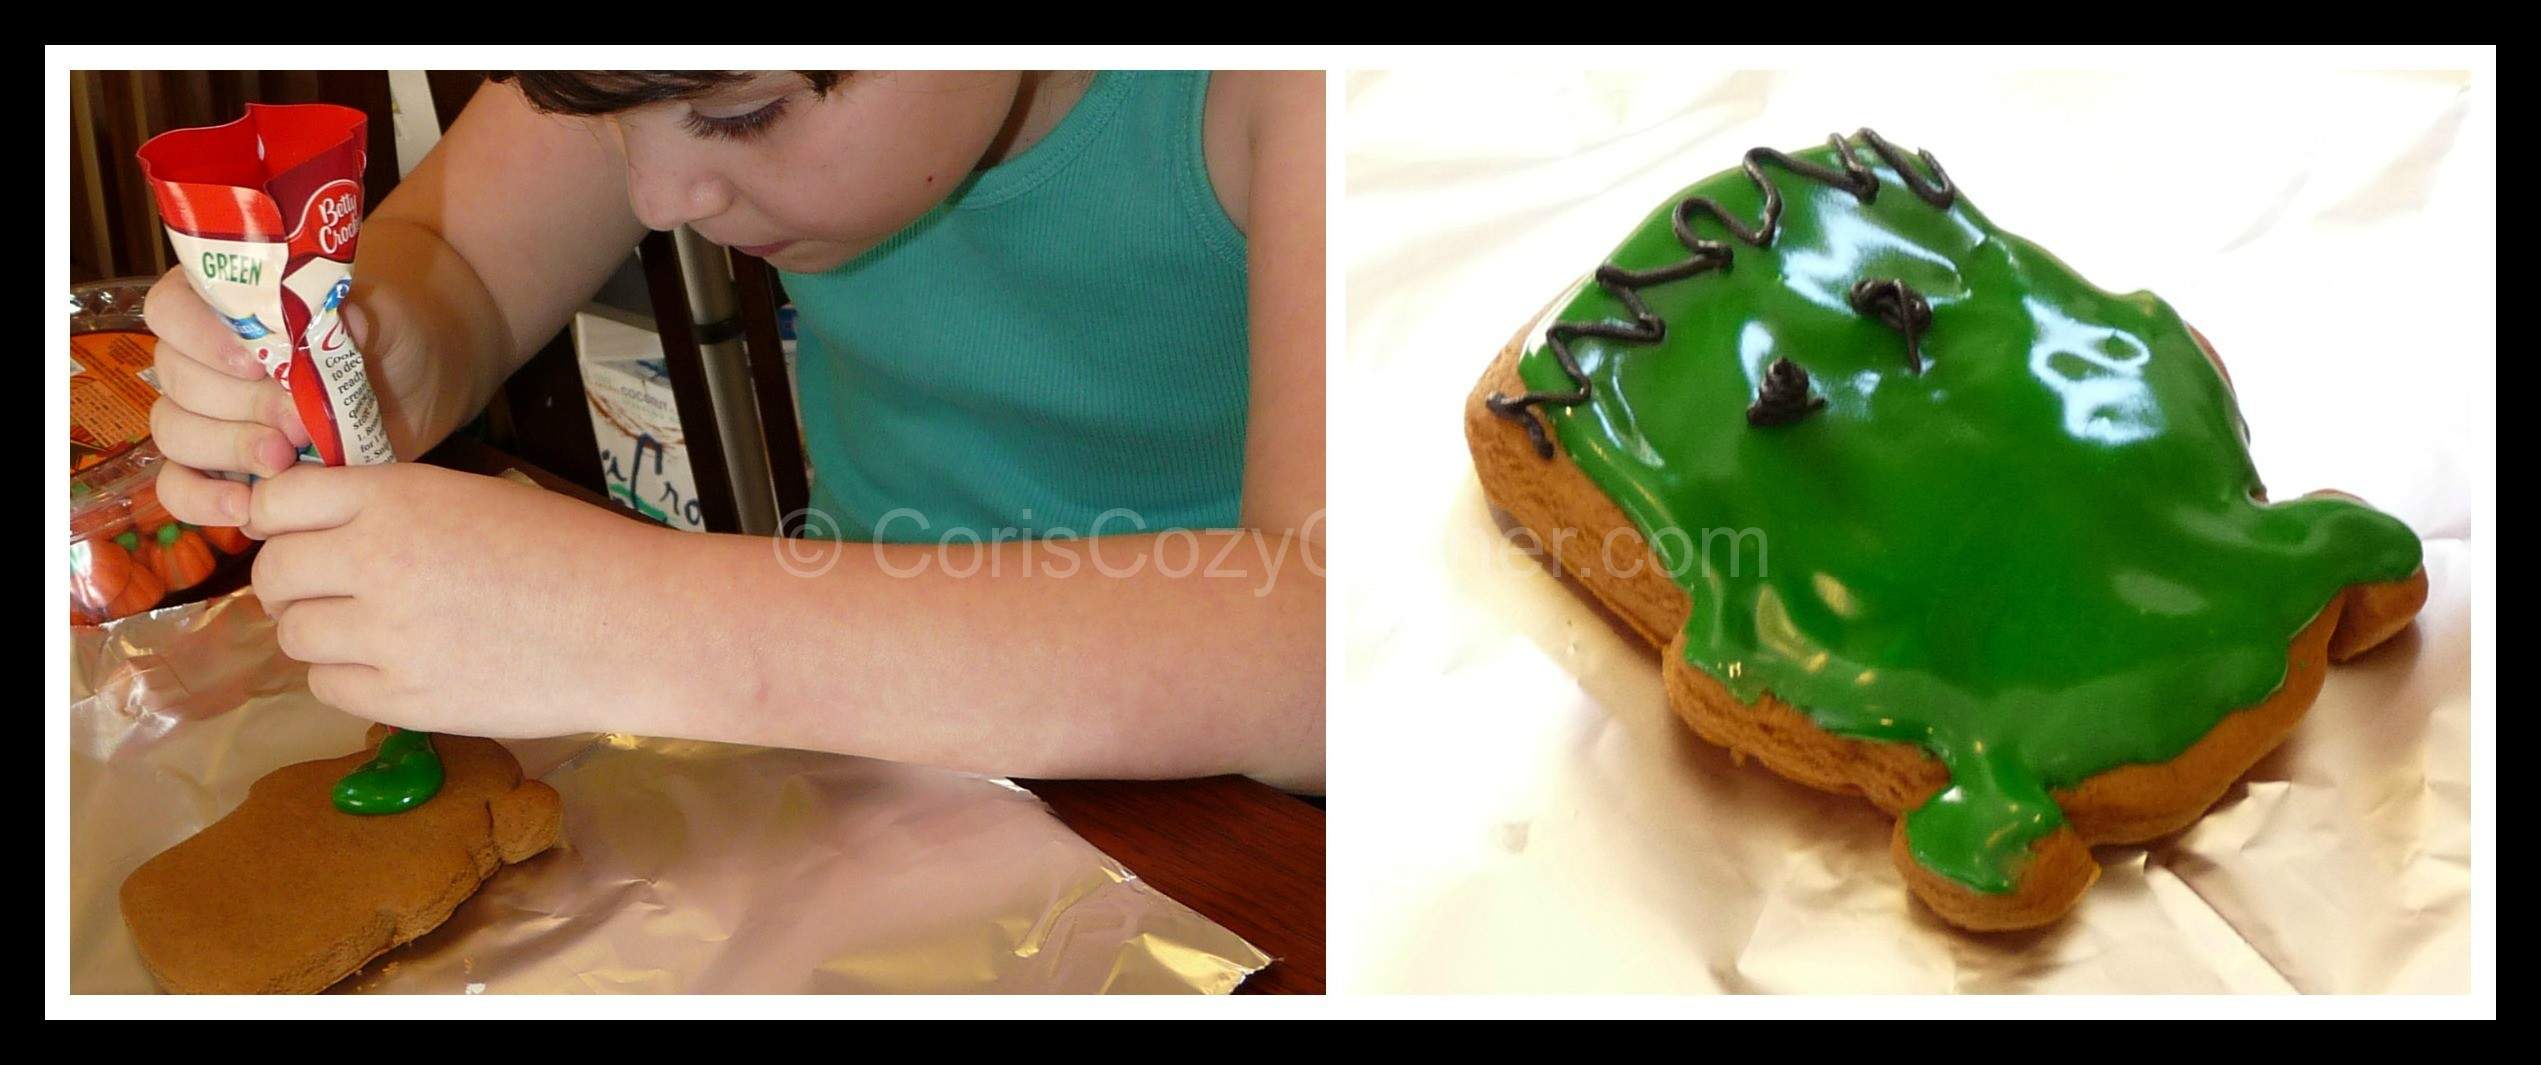
With the extra gingerbread dough we had made, my girls had fun making cookies and decorating them, too!

Want your own Sweet Creations Halloween baking products from Good Cook?
Use code HAUNTED23 and get 25% off your order.
Enter below to win your own Haunted House Party Kit.

Good Cook Giveaway Rules~  One prize per household for each Good Cook event.  If someone wins on 2 or more blogs, they – or their family members – cannot win a second prize from another blog in the same event.  If a household has won a prize in a Good Cook event, they can’t win again for 6 months.  If a household has won more than one prize in a previous Good Cook event, they can’t win again for 12 months.  Good Cook will confirm that winners are eligible and will disqualify anyone who has won more than once.  Prizes ship from Good Cook and can take 8-10 weeks after the contest ends, unless otherwise stated. You must be 18 or older to win. US shipping addresses only.  Good Cook reserves the right to substitute a prize of equal value if sufficient inventory is not available.


Enhanced by Zemanta
Cori's Cozy Corner Disclosure Policy

My Mission to Give the Gift of Sleep With @Pampers and #DDDivas #DivasSleep #sponsored #Giveaway

This post may contain affiliate links.
Thank you for visiting Cori's Cozy Corner! Please make sure to like us on Facebook, follow us on Twitter and subscribe to our E-mails!

“This review was made possible by Double Duty Divas and Pampers. I was provided the featured product free of charge to facilitate my review, but all opinions are 100% mine.”
Pampers_Logo_Teal
I was selected to be a part of an amazing campaign through Double Duty Divas and sponsored by Pampers.  I was given a $100 prepaid gift card and 2 packages of Pampers diapers and told to “give the gift of sleep” to a baby/family in my community.  These are the directions I was given:

Pampers is looking for bloggers to give back to a baby/family in their community all in the spirit of the “gift of sleep.” We want creative bloggers to surprise a deserving family with ways to promote sleep and capture your experience in pictures and/or video.  Maybe a gift basket of cozy linens, soft pajamas and lavender candles?  Perhaps a date night planned for the new Mom and Dad so they can sleep in?  It’s totally up to you!

My first thought was to surprise my next door neighbors.  They have a 9 month old daughter and the husband works off shore most of the month and is only home 8 days at a time.  This leaves his wife to take care of their baby by herself most of the month.  She works from home but as their daughter gets older and more mobile, it has gotten harder to work, get things done around the house, etc.

Planning my neighbor’s gift inspired me to do more.  I didn’t want to just “give the gift of sleep” to my neighbors, I wanted to give to as many people as I could.  That’s when I came up with the idea to buy pajamas to donate to a local shelter.  I decided to contact several companies to donate items for my neighbors’ gift so I would have the entire gift card to use to purchase pajamas.  (You can read about my gift of sleep to my neighbors here.)  But where would I find pajamas that were a decent quality but also inexpensive enough for me to purchase a decent amount of them to donate?  I searched the internet and came up empty handed.  Then I happened to glace over at a store ad for the week.  In the small corner section of the ad it said that they were having a summer clearance sale that included pajamas for only $3.99.  It was as if this sale was meant for me!
I rushed over and purchased 10 pairs of pajamas to donate (and some clothes for my daughters).  When I got home and checked my rewards account from the store I saw that I had earned $27 back in bonus rewards from that purchase.  I spent the next few days going to several different locations to purchase pajamas using a combination of the money on the gift card, the bonus reward points that I was earning from my purchases, and my own money.  In all I ended up buying 40 pairs of women’s pajamas to donate to a local women’s abuse shelter!
pajamas

I was so excited and felt so blessed to be able to donate 40 pairs of pajamas and the 2 packages of Pampers to the shelter this morning.  It feels so good to be able to give back to the community.  I had planed on asking if I could take some pictures of the shelter employees accepting my donation and whatever else they would have let me take pictures of.  I figured that because it was an abuse shelter I would only be able to photograph certain things.  What I hadn’t realized was that the shelter’s office would be closed for Columbus Day.  DOH!
Once I arrived the security guard buzzed me in and then helped me bring everything inside.  At that point I couldn’t turn around and say, “Sorry, I’ll come back tomorrow to make this donation so I can take pictures for my blog.”  So unfortunately I do not have pictures from today, but I do still have the warmth in my heart from knowing that I helped so many others.  I spent a long time talking to the security guard after I dropped the pajamas off.  She was telling me how so many women (and men too) come to the shelter with only the clothes on their backs, some even without shoes.  They have such a need for new items.  It was then that I knew that I would be back to the shelter again soon.  I plan on going back soon to donate toiletry items from my stockpile.

I want to thank Pampers and Double Duty Divas for this opportunity that has really had a huge impact on me.   This “gift of sleep” has turned into so much more for me and I hope it inspires you, too.

00037000601487_Z1C1_NA_GFTSRWRD_12_HOUR

Pampers diapers have superior overnight dryness and protection!  By interviewing over 9,000 moms about what was important for their baby, Pampers found the number one unmet need is a diaper that provides superior overnight dryness. Pampers incorporated this firsthand insight, as well as the brand’s deep understanding of baby and baby’s needs, to design a diaper that both mom and baby can count on for up to 12 hours of overnight protection.  Pampers Swaddlers, Pampers’ softest diaper and the #1 choice of hospitals, is now available through size 5.  Pampers Cruisers are now more absorbent and offer Pampers’ best fit for all the ways babies play freely.

00037000863458_Z7C1_NA_GFTSRWRD_CHOICE
Click the image below to learn more about Pampers’ new innovations:
pampers2 Connect to Pampers on Facebook and Pampers on Twitter.

Enter to win a Sleep Sheep Sound Machine, Cozy Blankets for Mom/Baby, and a $50 Gift Card. 
Cori's Cozy Corner Disclosure Policy

Aloette Cosmetics Red Wine Peel Review and Giveaway

This post may contain affiliate links.
Thank you for visiting Cori's Cozy Corner! Please make sure to like us on Facebook, follow us on Twitter and subscribe to our E-mails!

Disclosure- I received the product(s) mentioned below to facilitate my review.  I received no other compensation and all opinions are 100% my own.
red wine peel
My skin used to be very oily but as I have grown older I have noticed a change.  Now my skin does have some oil but it is also very dry.  I am constantly trying to battle the dry, rough patches across my forehead and cheeks.  I’ve tried many different facial scrubs but I haven’t found any that I really liked.  Sometimes they smell funny and other times they just don’t remove the dry spots of skin. I was asked to try Aloette’s Red Wine Peel and I jumped at the chance.
Aloette’s Red Wine Peel features exclusive Farm to Jar ingredients straight from Bordeux’s finest vineyards.  It uses red wine grapeseed extract to unclog pores and infuses skin with age-defying antioxidants for a visibly smoother, brighter appearance.  The first thing I noticed when I opened the Red Wine Peel container is the smell.  It smells AMAZING!  Just like fresh grapes.  You will absolutely love the way it smells but please resist the urge to eat it!  I wet my face and then rubbed a little of the scrub all over my face.  It is so fresh and there are even little pieces of grape in there.  It was like nothing I had used before.  Once I scrubbed all over my face I easily washed the scrub off and it left my face feeling clean and smooth.  Unlike other scrubs there was no soapy residue either.  I was able to see a difference right away.  My skin looked a brighter, smoother, and healthier.  I am going to continue to use the Red Wine Peel to tackle my next hurdle, clogged pores!
aloette red wine peel
Aloette’s Red Wine Peel retails for $46.99.  You can get this and other Aloette products from a local Aloette Consultant or through the Alloette website.  Don’t have a consultant? Visit the website and get connected to one!
Learn more about Aloette’s Red Wine Peel in this video:

Want to win Aloette’s Red Wine Peel?
One (1) Grand Prize winner will receive $100 in Aloette product and their Red Wine Peel free.
Five (5) winners will receive a free Red Wine Peel.
Enter to win:
a Rafflecopter giveaway


Cori's Cozy Corner Disclosure Policy

Zaycon Foods 40 Pounds of Chicken Breast Product Review!!!!

This post may contain affiliate links.
Thank you for visiting Cori's Cozy Corner! Please make sure to like us on Facebook, follow us on Twitter and subscribe to our E-mails!

Disclosure- I received 40 pounds of chicken as part of the US Family Guide Blogger program to facilitate my review.  I received no other compensation and all opinions are 100% my own.
1385837_669408866403204_1408392727_n

If you’re looking for farm fresh, natural foods, Zaycon Foods is for you.  Zaycon Foods isn’t a store you can go to.  Instead they have “events” all over the country where you can preorder several different food items including what I received, 40 pounds of chicken breasts.  They also have events for other fresh meats including pork, beef, turkey, and fish as well as well as other fresh products.

1381640_10151631707571770_207803669_n
The chicken breasts from Zaycon Foods are 100% natural with no hormones or preservatives.  They come farm fresh, not frozen, in one cardboard box that contains 40 pounds of boneless, skinless chicken breasts in it.  Inside each box is 4 plastic bags that each contain 10 pounds of chicken in them.  This is the second time I have ordered chicken from Zaycon and I am always amazed at the size of the chicken breasts.  They are HUGE, beautiful chicken breasts that each weigh about a pound.  They really put all other chicken breasts to shame.  And because they sell it in larger quantities they can offer it at an amazing price.


40 Pound Box of Zaycon Foods Boneless, Skinless Chicken Breasts

Open Box of Zaycon Foods Boneless, Skinless Chicken Breasts

About 10 Pound of Pre-Prepped Boneless, Skinless Chicken Breasts

(Note how there is not much skin, fat, etc. that needs to be trimmed)

There is some prep work involved once you bring your box home.  Each piece comes as a boneless, skinless butterflied breast which means it’s really 2 breast pieces the way they are naturally connected on a chicken.  All you have to do when you get your chicken home is to use a sharp knife to separate the 2 breasts and clean them up a bit.  I don’t like messing with raw chicken usually, but it wasn’t bad at all.

One Whole Chicken Breast

Note: It’s almost as big as my cutting board!

Chicken Breast Cut in Half

About 10 Pounds of Prepped Chicken Breasts

Once my chicken was separated into individual breasts, I portioned it into different Ziploc baggies to store it in my refrigerator and freezer.   I cut some up in dices, some in strips, some in tenders, and some I left whole.  Now when I want to make chicken, I can just reach in my freezer and take out a portion.

40 Pounds of Chicken Breasts Bagged and Ready To Be Frozen

The chicken is some of the most delicious chicken I’ve ever had.  It tastes so fresh.  When I grilled my first batch of chicken breasts I ended up having to cut each one in half horizontally because they are so thick.  Now I have learned to slice the breasts horizontally to make them cook faster.

Ordering from Zaycon Foods was easy.  I signed up for a FREE account, found an event in my area, and ordered a box of chicken.  The day of the event I just just had to show the receipt and I didn’t even have to get out of my car.  They put down a sheet of plastic and loaded the box of chicken right in my trunk!

Zaycon Food’s customers choose the locations that they have their events.  If there is a city that gives a sufficient interest, they will be happy to consider scheduling an event in the area.  Check out their website to see if they have any upcoming events in your area and if they don’t, e-mail them to request an event.  I can’t wait until they come back to my area with beef!!!

Three reasons for buying from Zaycon Foods:
1) Quality: We only sell what we eat ourselves— high-quality, healthy food products
2) Price: Fresh, high-quality retail food products sold for wholesale prices
3) Customer Service: Exceptional service all along the way, from order to reminder to convenient, efficient pickup


Sign up for a FREE account and they will notify you when there is an event in your area.

Follow Zaycon Foods on Facebook

Follow Zaycon Foods on Twitter

Follow Zaycon Foods Blog

Cori's Cozy Corner Disclosure Policy

Pet Stuff Tower Product Review and Giveaway

This post may contain affiliate links.
Thank you for visiting Cori's Cozy Corner! Please make sure to like us on Facebook, follow us on Twitter and subscribe to our E-mails!

Disclosure- I received the product(s) mentioned below to facilitate my review.  I received no other compensation and all opinions are 100% my own.
pet stuff tower product review
As any pet owner knows, pets have lots of STUFF.  We recently adopted a puppy and I was getting tired of having multiple bags of dog food on the floor and no where to put them.  I was searching for something that looked nice, would keep the food fresh, and would also hold some of Cooper’s other things.  That’s when I found the Pet Stuff Tower from Richell.
pet stuff tower2
The Pet Stuff Tower is a little under 3 feet tall and has 2 generously sized bins.  It snaps together without tools for very easy assembly.  The bottom bin has a foot pedal so you can easily access it without using your hands.  Both bins feature snap-lock lids to keep food fresh.  We are in the middle of switching Cooper to a different variety of dog food.  Right now we are slowly giving him more of the new food and less of the old food so we can’t just store his food directly in the bin.  Once he is only on one type of food we will be keeping his food loose in the bottom bin.   Each bin holds up to 8 pounds of dry pet food and you can easily remove a bin to clean it out if needed.

pet stuff tower
There are hooks on both sides that you can use to hang a lease, hang a bag, or many other things.  You can also use the flat area on top to keep some of your pooch’s other things.  Just make sure to not overload either bin or the top.  In our top bin we are keeping all of Cooper’s things.  It is a pretty big space so I was able to put lots of things in it.  You can see in the picture above that I have 1 really long leash, 1 wire cable, a bandana, a dog hair brush, a rotary nail trimmer, pet wipes, and several toys and there is still plenty of room.  You could also use the top bin to store food for another pet, treats, etc.  It also includes a 1 1/2 cup food scoop that can be used as a food bowl.  We are keeping our Pet Stuff Tower right next to where we feed Cooper so everything is contained and not all over the place.  It looks so much less cluttered now.
Connect with Richell on Facebook
pet stuff tower2
Want your own Pet Stuff Tower?
Enter below:

Cori's Cozy Corner Disclosure Policy

S’Mores Popcorn Balls #goodcookcom #goodcookkitchenexprt

This post may contain affiliate links.
Thank you for visiting Cori's Cozy Corner! Please make sure to like us on Facebook, follow us on Twitter and subscribe to our E-mails!

Disclosure- I received the item(s) mentioned below to conduct my review.  I received no other compensation and my opinions are 100% my own.
smores popcorn balls

There are so many yummy things you can make with the Good Cook Popcorn Ballers.  I made Caramel Turtle Popcorn Balls for my official Good Cook Popcorn Ball event post but I decided to also make S’Mores Popcorn Balls, too.  Both flavors came out really delicious and were very easy to make.  The popcorn baller really helped to make the popcorn balls round and even sized.

Ingredients-

  • 16 cups popcorn (I popped it in a pot on the stove but you can choose any method you prefer)
  • 1 10 oz. bag miniature marshmallows
  • 1/2 c. butter
  • 2 cups milk chocolate chips- divided 1 1/2 cups and 1/2 cups
  • 2 cups Golden Grahams cereal
  • 1 T. butter for your fingers (optional)

Directions-

P1180449
~Pop popcorn any method you prefer.  I prefer popping it in a pot on the stove for this particular recipe.

P1180451
~ Melt butter and marshmallows in a medium pot over medium head stirring frequently.  When the marshmallows are almost fully melted, remove pot from burner and stir to fully melt the marshmallows.  Pour half of the marshmallow mixture over the popcorn and fold gently to coat.  Pour the rest of the marshmallow mixture over the popcorn and fold again until completely coated.
P1180452
P1180453P1180454

~Fold in Golden Grahams cereal and 1 1/2 cups of chocolate chips until combined.  Allow to cool for a few minutes and fold in remaining chocolate chips so some retain their shape.

P1180455
~Spray popcorn baller with a light coat of non-stick cooking spray.  Fill baller with popcorn mixture in a heaping mound.  (You might prefer to butter your fingers to fill the baller and remove the popcorn ball from the mold.)
P1180456
~Place top on baller and press down until ball is formed.  Remove top of baller, take popcorn ball out of mold and place on waxed paper/parchment to cool and harden.  Enjoy!  (Store in airtight container or wrap individually in cellophane bag to give as gifts.)
smores popcorn ball 2
Make to to check out Good Cook’s 7 day Popcorn Giveaway on Facebook starting Oct. 7, 2013.
Want to get your own Good Cook Popcorn Baller?  Get 25% off to goodcook.com with code: POPCORN


Cori's Cozy Corner Disclosure Policy

Caramel Turtle Popcorn Balls #goodcookcom #goodcookkitchenexprt

This post may contain affiliate links.
Thank you for visiting Cori's Cozy Corner! Please make sure to like us on Facebook, follow us on Twitter and subscribe to our E-mails!

caramel turtle popcorn balls

When I was selected to be part of Good Cook’s Popcorn Ballers event I had so many ideas of what flavors to make that I decided to make two different recipes- S’More Popcorn Balls and Caramel Turtle Popcorn Balls.  I had never made popcorn balls before but with the Good Cook Popcorn Baller it was really easy.  The baller made the popcorn balls round and even sized.  Good Cook also sent me other great items to help with the recipes including 2 bowls, a spatula, a candy thermometer, and a sauce pan.  You can find them all on the Good Cook website.good cook popcorn ball supplies

Ingredients-

  • 14 cups popcorn (I popped it in a pot on the stove but you can choose any method you prefer)
  • 2 cups carmamel squares
  • 1 Tablespoon water
  • 1 Tablespoon butter
  • 2 cups semi-sweet chocolate chips
  • 1 cup pecans (whole or chopped)
  • 1 T. butter for your fingers (optional)

Directions-

P1180449
~Pop popcorn any method you prefer.  I prefer popping it in a pot on the stove for this particular recipe.

P1180461
~ Melt caramel and 1 tablespoon water in a medium pot over medium head stirring frequently.  When almost melted add 1 tablespoon butter and stir until smooth.
P1180462
~When caramel mixture is smooth, remove pot from burner and pour half over the popcorn and fold gently to coat.  Pour the rest of the caramel mixture over the popcorn and fold again until completely coated.
P1180463
~Fold in chocolate chips and pecans until combined.
caramel turtle 2
~Spray popcorn baller with a light coat of non-stick cooking spray.  Fill baller with popcorn mixture in a heaping mound.   (You might prefer to butter your fingers to fill the baller and remove the popcorn ball from the mold.) Place top on baller and press down until ball is formed.  Remove top of baller, take popcorn ball out of mold and place on waxed paper/parchment to cool and harden.  Enjoy!  (Store in airtight container or wrap individually in cellophane bag to give as gifts.)

Make to to check out Good Cook’s 7 day Popcorn Giveaway on Facebook starting Oct. 7, 2013.
Want to get your own Good Cook Popcorn Baller?  Get 25% off to goodcook.com with code: POPCORN


Cori's Cozy Corner Disclosure Policy

SushiQuik At-Home Sushi Making Kit Product Review and Giveaway

This post may contain affiliate links.
Thank you for visiting Cori's Cozy Corner! Please make sure to like us on Facebook, follow us on Twitter and subscribe to our E-mails!

Disclosure- I received the item(s) mentioned below to conduct my review.  I received no other compensation and my opinions are 100% my own.
SushiQuik Sushi Making Kit
My husband and I love sushi but we have always been too intimidated to make it at home.  Sushi can get expensive so it is a treat when we go out for sushi.  We’ve tried sushi from the local grocery store but it just isn’t the same.  I recently found out about SushiQuik sushi making kit and I knew I had to try it.  I bought all the ingredients that I needed, made the rice according to the package directions, and then realized that I forgot to buy nori (the seaweed wrappers).  I didn’t have anything else to use to wrap the sushi so I had to give up my idea for a sushi lunch that day.  DOH!  Make sure you have all the supplies you need to make sushi BEFORE you make your rice!

The next time I went to the grocery store I purchased nori and was ready to make my sushi.  I put sushi rice in my rice cooker and cooked it according to the directions.  While the rice was cooking I assembled my ingredients.  What is great about making sushi is that you can fill it with whatever ingredients you want.  I was making several different types of rolls so I had carrots, avocado, cream cheese, imitation crab meat, and shrimp tempura.  I cut my ingredients into smaller pieces so they would fit inside my rolls.  If you have pieces of filling that are too big, your roll will not stay together.  When the rice finished cooking I stirred in a tablespoon of rice wine vinegar and I was ready to start rolling.
sushiquik collage

It is so easy to roll sushi with the SushiQuik sushi making kit.  First lay the white mat out on top of the black stand.  There is a tab on the bottom of the mat that fits into a slot on the stand so it stays in place.  Place a piece of nori flat on the white mat and cover it with the frame making sure that you can see the nori through the slit on the top of the frame.  Using the rice paddle, place rice on top of the nori and spread it to cover the entire surface of the inside of the frame.  Make sure it is the same height of the frame and not higher.  I kept a cup of water next to me and found it easier to dip my fingers in the water and use them to press the rice down and spread it out to fit inside the frame.  Some people might prefer to only use the rice paddle.  The choice is yours.  Make sure there is no rice across the end of the nori that is furthest from you.  Remove the frame and you are ready to add your ingredients across your nori about 1/4 of the way down the area of the rice.  Do not over stuff or your roll will be too thick.  When you have all your ingredients on your rice, dip your fingers into the water and moisten the nori on the end opposite you.  Now start rolling the sushi from the bottom end that is closer to you.  Continue rolling up the mat with your sushi inside until you reach the end making sure to tighten the roll as you go.  When you get to the end, wrap the moistened end around your roll to seal it.  Place your roll on a cutting board and put the cutting guide over it.  Use the cutting guide to easily cut your sushi into equal pieces.  You can use the end caps from the roller as dipping sauce cups for soy sauce, eel sauce, or whatever you like to dip your sushi in.  Feel free to experiment with different fillings and different sauces.  The options are limitless.  My husband was surprise when he came home and tried the sushi I had made.  He thought it had come from a restaurant and said he will never buy sushi from the grocery store again.
sushi
I created 2 different varieties of sushi and I already have ideas for the next time.  This time I made one roll with imitation crab meat, cream cheese, avocado, and carrots and the second roll had shrimp tempura, cream cheese, avocado, and carrots.  I was really amazed how easy the SushiQuik was to use.  Both my girls (7 and 9 years old) were able to make rolls themselves with supervision.  I love how the SushiQuik kit rolls up for easy storage, too, which is important because space in my kitchen is so limited.  If you love sushi, try making it yourself at home with the SushiQuik.  It would make a great holiday gift for any sushi lover, too.
Making Sushi
You can order the SushiQuik Kit on their website and on Amazon.

Want to win your own SushiQuik Kit?
Enter below:

a Rafflecopter giveaway

Cori's Cozy Corner Disclosure Policy

Walking My Puppy Cooper at Night is Easier Thanks to My New Panther Vision POWERCAP® LED Lighted Hat

This post may contain affiliate links.
Thank you for visiting Cori's Cozy Corner! Please make sure to like us on Facebook, follow us on Twitter and subscribe to our E-mails!

Disclosure- We received the products mentioned below to conduct our review.  We received no other compensation and all opinions are 100% our own.
Panther Vision POWERCAP® LED Lighted Hat
We recently adopted a puppy, Cooper, and everyone in our family has been taking turns walking him.  When we walk him at night we’ve had to remember to bring a flashlight with us because it is pretty dark around our house.  But holding a flashlight can get cumbersome when you’re trying to clean up after a puppy.  Then I found Panther Vision’s POWERCAP® LED Lighted Hat.  This premium brushed cotton twill baseball style cap has 2 sets of 2 bright LED lights that provide more than 48 Lumens for hands-free light.  The 4 CR2032 coin cell batteries are hidden discretely inside the sweatband so it looks like a regular cap when the lights are off.  The hidden button under the brim easily turn the lights on and off with a simple click.  Another great feature of this cap is that 2 of the LED’s are angled down at 25 degrees to light up where your hands are for close up tasks and the other 2 LEDs are aimed forward to light the distance up to 42 feet away.  It makes taking Cooper out for nighttime walks so much easier.  As their website says, “It’s #1 for picking up #2”!  The cap is adjustable so my husband and I can both comfortably wear it on our walks.  Even my daughters like wearing it.  They think wearing a cap with lights is so cool.  It comes in several colors and styles so it is easy to find you’ll like.  If you have a dog that you walk at night, this is a must have.  It would make a great holiday gift for any dog owner, too!  Of course this cap would be great for camping, fishing, hunting, emergencies, reading, walking, auto repair, and home improvement, too!

I have 2 tips for when you are wearing the cap:
1. Remember you are wearing a cap with bright lights so don’t look directly into someone else’s face or you’ll blind them with the light.  (Sorry honey!”
2. If you live where there are a lot of flying insects at night like mosquitoes, remember to wear insect repellent as the bright lights seem to attract mosquitoes right to them.  My face was bitten a few times before I remembered to wear insect repellent.  I’ve now sprayed the cap with a little natural, Deet-free insect repellent so they seem to stay away.  I just respray every few days and so far so good.

LIGHTSPECS® Vindicator™ LED Lighted Safety GlassesIf you like to craft or work on your car and need a little help seeing things up close, I have a product for you to check out.  Panther Vision Lightspecs Vindicator Bifocal Lighted Safety Glasses combine impact resistant stylish safety bifocal glasses with ulta-bright LEDs.  They are great for protecting your eyes while helping you focusing on any do-it-yourself project.  The LEDs are concealed in the temples and are aimed inward so you can look down and have the light shine exactly where you need it without causing any dark spots.  The LEDs in these glasses provide more than 32 Lumens of light and include batteries so you can use them right away.  Each side has it’s own on/off switch so if you don’t need extra light you can turn the LEDs off and just use the glasses to protect your eyes and the bifocals to see more clearly.  I am just starting to have problems seeing up close but I don’t need bifocals YET.  I am keeping these glasses for when I do need bifocals to help me see up close.  I am excited that I’ll be able to see with them and still look cute. 😉

Cori's Cozy Corner Disclosure Policy

Superior Source Brand Vitamin Review and Giveaway

This post may contain affiliate links.
Thank you for visiting Cori's Cozy Corner! Please make sure to like us on Facebook, follow us on Twitter and subscribe to our E-mails!

 Disclosure- I received the products mentioned below and/or compensation as part of the Superior Source Vitamins Brand Ambassador program.  All opinions are 100% my own.

superior source vitamin D
Vitamins are so important but sometimes getting my family to take them can be a challenge.  Then I was introduced to Superior Source Vitamins.  Superior Source Vitamins have MicroLingual® “Under the Tongue Technology” that work FAST.  They dissolve quickly under the tongue and are quickly absorbed by into the body.  My younger daughter can’t swallow pills so this is perfect!  When you swallow supplements, as much as 50% of the potency can be lost in the high acid environment of the stomach.

Vitamin D has recently been in the news and recent studies show how Vitamin D, the “sunshine vitamin” supports bone and dental health, promotes healthy muscle tone, as well as enhancing a level mood and supporting healthy blood glucose levels.  It is not only safe but also vital for all ages.  Superior Source’s Vitamin D comes in a whole line of strengths for every member of your family.
SSV Vitamin D Family 5-Pack 9.17.13-1

Vitamin D Family Pack

1.   Baby Vitamin D – 200 IU: Vitamin D works in conjunction with calcium to promote the development and maintenance of strong bones and teeth.  Their Vitamin D products are D3, the finest source of Vitamin D available.

2.   Children’s Vitamin D – 400 IU: Vitamin D works in conjunction with calcium to promote the development and maintenance of strong bones and teeth.  Their Vitamin D products are D3, the finest source of Vitamin D available.

3.   Adult Extra Strength Vitamin D – 10,000 IU / 5,000 IU / 1,000 IU: Vitamin D works in conjunction with calcium to promote the development and maintenance of strong bones and teeth.  Their Vitamin D products are D3, the finest source of Vitamin D available.

Based on a review of 21 clinical trials, the  Council for Responsible Nutrition (CRN) has recommended that the tolerable upper intake level for D3 be increased from 10,000 International Units (IU).  That’s a big jump from the previously recommended 50 micrograms to 250 micrograms per day.  There simply aren’t any adverse effects from higher doses, and many health-promoting benefits to gain from substantial supplementation.
Vitamin D is known for:

  • Supporting bone health and muscle tone*

  • Maintaining a stable mood*

  • Enhancing immune system response*

  • Enhancing absorption of phosphorus, which supports metabolism and energy*

  • Maintaining healthy blood glucose and blood pressure levels already within the normal range*

While Vitamin D can be found in small amounts in milk, fish, liver, and egg yolk, the human body mainly relies on manufacturing it through exposure to sunlight.   With today’s modern diet and lifestyles, it can often be a challenge to get enough vitamin D each day. Some estimates claim as much as 60 percent of northern populations may be vitamin D deficient. With the new upper limit now set by the CRN, consumers are able to make better-informed decisions about appropriate vitamin D products.

As adults age, the natural decline of hormones results in a decline in the body’s ability to regulate mood and maintain healthy muscle and bone. Vitamin D is a great supplement for enhancing all of these processes.*

70% of Children in the United States are Running Short on Vitamin D!

Infants and Children

According to the National Health and Nutrition Examination Survey, 9% of children in the U.S. are “vitamin D deficient”, while 61% are technically running “insufficient”. Researchers have identified several possible risk factors for the nationwide deficiency and insufficiency:

  • Lack of sunshine exposure
  • Poor diet – not enough milk or fish
  • Breast-feeding – breast milk is often low in vitamin D
  • Darker skin – lighter skin tends to produce vitamin D more efficiently

More and more parents are discovering the importance of Vitamin D for enhancing immune system function and supporting development of strong bones, teeth, and muscle. Both infants and young children can benefit from supplementation.*

The American Academy of Pediatrics now recommends 400 IU of supplemental vitamin D for breastfed newborns in the first few days of life, followed by a maintenance dose of 200 IU for infants up to two months old. Young children benefit from supplementation that brings their daily intake up to 400 IU. While changes in sun exposure and diet can help, supplementing is the only way to completely ensure that a child is getting enough vitamin D.

As a Superior Source Vitamin Brand Ambassador I received the Superior Source Vitamin D Family Pack to try with my family.  I love that there is a strength for every member of my family.  There is even a strength for babies that I am going to give to my neighbor who has a infant.  The pills are very tiny so my children don’t object to taking them.  They dissolve easily under their tongues and have a slight sweet, milky taste so my children take them easily as part of their morning routine with their breakfast.  As a mom I want as much vitamins and nutrition to go into my family’s body so I really like that Superior Source Vitamins go into the bloodstream so quickly to get right to work in the body.  We are looking forward to trying other Superior Source Vitamins.

Adult potencies from 400 IU to 10,000 IU

: Tolerable Upper Intake Levels (ULs) for Vitamin D [1]

Age

Male

Female

Pregnancy

Lactation

0–6 months

1,000 IU
(25 mcg)

1,000 IU
(25 mcg)

7–12 months

1,500 IU
(38 mcg)

1,500 IU
(38 mcg)

1–3 years

2,500 IU
(63 mcg)

2,500 IU
(63 mcg)

4–8 years

3,000 IU
(75 mcg)

3,000 IU
(75 mcg)

≥9 years

4,000 IU
(100 mcg)

4,000 IU
(100 mcg)

4,000 IU
(100 mcg)

4,000 IU
(100 mcg)

Sources
J.N. Hathcock, A. Shao, R. Vieth, R. Heaney. “Risk assessment for vitamin D.” American Journal of Clinical Nutrition; January 2007, Volume 85, Pages 6-18.

M. Melamed, J Kumar, P Muntner, F Kaskel, S Hailpern. “Prevalence and Associations of 25-Hydroxyvitamin D Deficiency in Children and Adolescents in the United States: Results from NHANES 2001-2004,” Pediatrics online: http://pediatrics.aappublications.org/cgi/content/abstract/peds.2009-0051v1

With Superior Source Vitamins everyone’s a “winner”!
Receive a FREE Vitamin D of your choice by “Liking” the 
Superior Source Vitamins Facebook page.
FREE 60-Day Supply of Vitamin D:  Baby 200 IU, Children’s 400 IU or Adult 1,000 / 5,000 / 10,000 IU.
(Just pay $4.95 S&H. One product per household)
SSV Vitamin Gift 4-Pack 9.17.13
Want to try Superior Source Vitamins for yourself?
3 lucky winners will each receive a vitamin gift pack including:

1.   Advanced B-12 – 2,000 mcg: B-12 is essential for top energy levels, heart health and mental clarity. The innovative “under the tongue” MicroLingual® delivery system is designed to make B-12 immediately available for absorption into the bloodstream.

2.   NEW Vitamin C “Tangy” Orange Melts – 500 mg: Superior Source Vitamin C 500 mg utilizes a non-acidic form of C that doesn’t contribute to gastric irritation; and is sugar free. Although each MicroLingual® tablet contains very little sodium (only 1% of the Daily Requirement), it is helpful in offsetting the natural acidity of Vitamin C, creating a smoother, less acidic taste. The sodium in this product differs from common table salt in that it is not combined with chloride like the “salt” most often associated with hypertension. Additionally, Tangy Orange Melts are formulated with a proprietary blend including Acai Berry, Acerola Cherry and Citrus Bioflavonoids. NO sugar added; only sweetened with a little stevia. This is preferable to most “chewable” Vitamin C products that typically are loaded with lots of sugar.

3.   Extra Strength Vitamin D – 5,000 IU: Vitamin D works in conjunction with calcium to promote the development and maintenance of strong bones and teeth. Our Vitamin D products are D3, the finest source of Vitamin D available.

4.   Children’s Vitamin D – 400 IU: Vitamin D works in conjunction with calcium to promote the development and maintenance of strong bones and teeth. Our Vitamin D products are D3, the finest source of Vitamin D available.
Enter below:
a Rafflecopter giveaway

Follow Superior Source Vitamins:
Superior Source Vitamins on their website
Superior Source Vitamins on Facebook
Superior Source Vitamins on Twitter
Superior Source Vitamins on YouTube


Cori's Cozy Corner Disclosure Policy